Photo header credited to JFVelasquez Floro
Gcash Overview
Gcash is one of the Philippine’s most popular fintech or financial tech or mobile wallet where everyone can send and receive money. Gcash is more than just a money transaction application. It’s also a savings, mobile loading and stock trading app.
Key Features
Payments & Transfers
- Pay bills to over 400+ billers.
- Send money instantly to 40+ banks and other GCash users.
- Receive remittances and link to PayPal.
Savings & Investments
- GSave: Digital savings accounts with partner banks.
- GInvest: Access to local and global funds.
- GBonds & GStocks: Government bonds and stock trading.
Credit & Loans
- GCredit, GGives, GLoan: Microloans and installment options for everyday needs.
Insurance
- GInsure: Affordable coverage for health, travel, and life.
How to Open a Gcash Account.
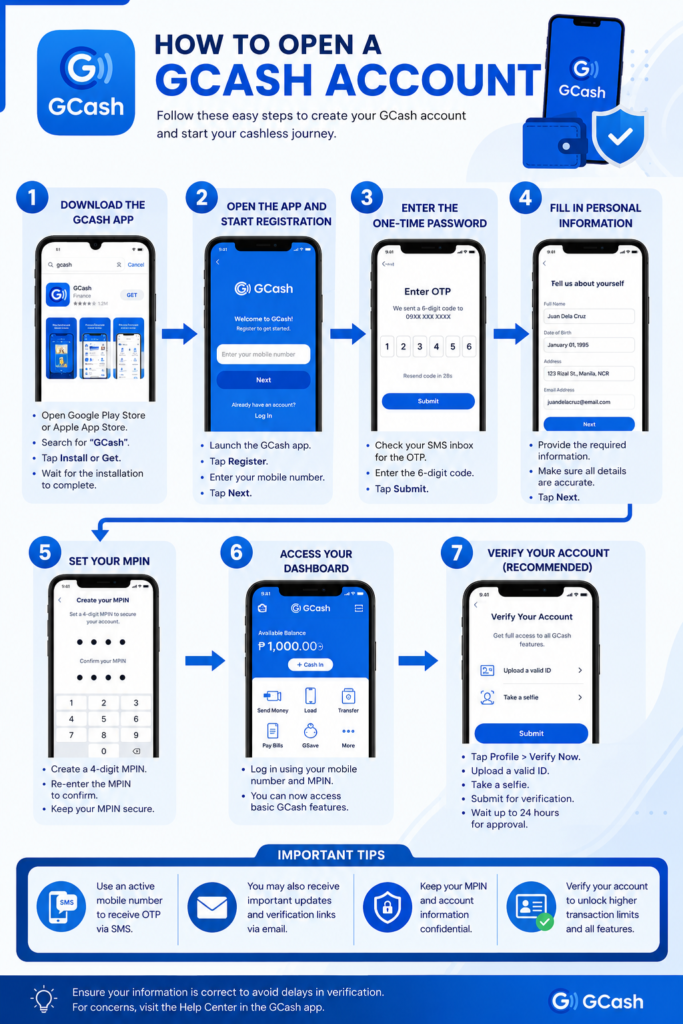
Step 1: Download the GCash Application
Procedure:
- Open the Google Play Store or Apple App Store.
- Search for GCash.
- Tap Install (Android) or Get (iOS).
- Wait for the installation to complete.
Step 2: Open the App and Start Registration
Procedure:
- Launch the GCash app.
- Tap Register.
- Enter your mobile number.
- Tap Next.
Step 3: Enter the One-Time Password (OTP)
Procedure:
- Check your SMS inbox for the OTP.
- Enter the 6-digit code in the app.
- Tap Submit.
Step 4: Fill in Personal Information
Procedure:
- Provide required details:
- Full Name
- Date of Birth
- Address
- Email Address
- Review entries for accuracy.
- Tap Next.
Step 5: Set Your MPIN
Procedure:
- Create a 4-digit MPIN.
- Re-enter the MPIN to confirm.
- Keep your MPIN secure.
Step 6: Access Your Dashboard
Procedure:
- Log in using your mobile number and MPIN.
- The GCash dashboard will be displayed.
- You can now use basic features.
Step 7: Verify Your Account (Recommended)
Procedure:
- Tap Profile.
- Select Verify Now.
- Upload a valid ID.
- Take a selfie for identity confirmation.
- Submit for verification.
